There are many easy, fast and affordable tools out there when you want to build a website, but the Elementor Page Builder is one of the foremost page builders out there. Building your own website is now easier than ever and if you, like most people, don’t know where to start, look no further than this Elementor guide.
[toc]
Elementor is one of the best page building solutions out there today, and to make it better, you don’t need to have any prior coding knowledge to use it.
So, this step-by-step Elementor guide will help you:
- Get started with Elementor;
- Create beautiful websites with Elementor;
- Start your eCommerce business with Elementor;
- Publish your first Elementor website.
Before we dive into the nitty-gritty of this Elementor guide, let’s quickly recap what Elementor is and what makes it so good.
What Is Elementor?
Elementor is a WordPress plugin that will help you build and design your website, it can help you with entire web pages or specific sections of a web page – Elementor is therefore a page builder.
The Elementor page builder also has the Theme Builder feature which enables you to create sections, or entire page structures, which are then displayed throughout your entire website. This feature is incredibly important for having continuity and will give your website a professional, sleek look that flows seamlessly.
Having said that, you can also use it for a specific section, such as Events or Latest Posts which are often displayed on more than one web page.
What Makes Elementor So Good?
What makes the Elementor Page Builder superior to other page builders is the level of customization you are given. Elementor offers a variety of templates to choose from and any changes you make are directly shown on the front-end of the website. Later in this Elementor guide, we will go through each of the customizable options you have at your disposal, in detail.
Not to mention the adding of a custom sales or landing page, opt-in forms, custom headers and footers, global widgets, and also pop-ups. The possibilities are truly endless. If you want to make a website that looks and runs as effortless as the Apple, Google, or Spotify websites do, then Elementor is the go-to choice.
Moreover, with their latest update Elementor has reduced the number of DOM elements which has made the plug-in lightning fast. So not only will it improve the look of your website, but it will also improve your page speed rankings and the overall experience for users on the website.
This is further made possible due to the way Elementor renders dynamic CSS values. Elementor prepares a post that is sent to the browser where it scans for CSS values. If it contains CSS values, Elementor ‘prints’ that CSS. Since this process is extremely resourceful and expensive, Elementor reduces this time by storing a list of dynamic values for each post. What does that result in? Rapid page speeds, smooth user experience, and ultimately, improved Google rankings.
Check out this restaurant website made with Elementor.

Now we know what’s possible with Elementor, let’s take a look at how to set up Elementor.
1. Getting Started With Elementor
The first step in this Elementor guide is to create an account. As with everything else Elementor related, it is super easy. You’ll need to click the green Get Started button.

1.1. Elementor Pricing Plans
There are a few different plans you can choose from. There is a free version that gives you all the basic features and templates, and also the Pro version which gives you access to Elementor in all its glory. So, if you want to optimize your website with the best features and designs, and for multiple websites, use Elementor at its full capacity and go for a Pro plan.
You won’t be breaking the bank though, Elementor’s plans are extremely affordable – starting at only $49/year.

If you are unsure as to which plan best works for you, Elementor comes with a 30-day money-back guarantee for each and every one of its plans. This eases the pressure of making a lasting decision, and you can essentially try before you buy.
1.2. Installing Elementor to WordPress
The next important step in this Elementor guide is to add the plugin to WordPress, which of course needs to be done before you can start using it. You can do it in 2 ways – directly via the Elementor website, or through your WordPress Admin Dashboard.
To install it via the Elementor website, navigate to Elementor.com, and click Download. From here, navigate to your WordPress Dashboard > Plugins > Add New. Here you will be able to upload the .zip file you just downloaded. Upload it, and then activate it.
To install it via the WordPress Admin Dashboard, navigate to Plugins, search for Elementor, and simply click Install. All that remains now is to activate it, and you’re all set.
Regardless of your installation method, once it is installed, you can find it in the Installed Plugins section on your WordPress dashboard. From here you will also be able to adjust settings and upgrade/downgrade your plan.
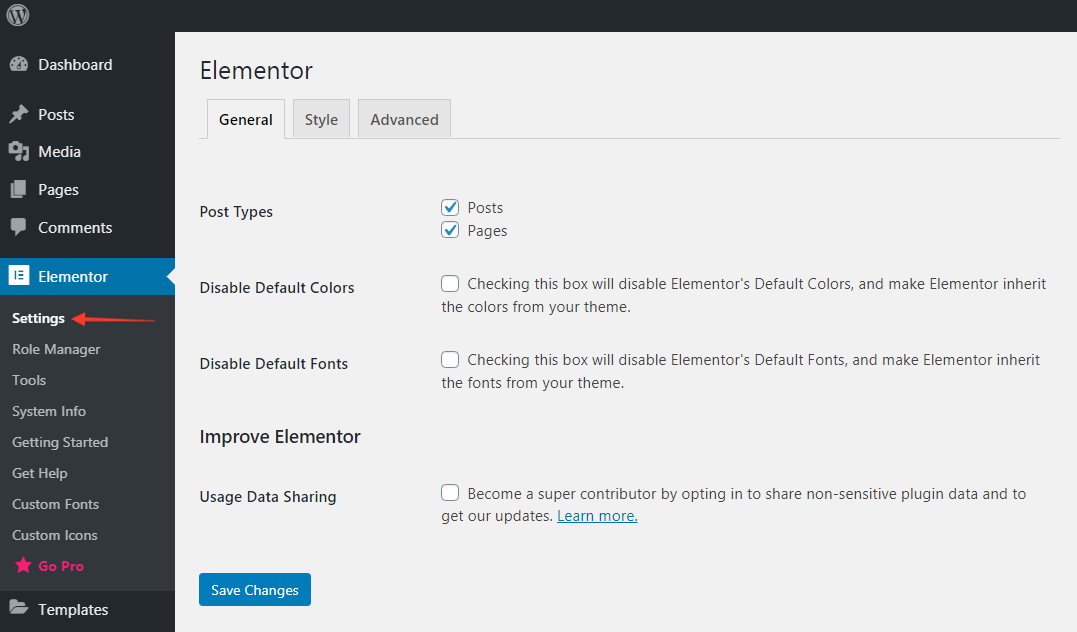
1.3. High-Level Settings for Elementor
Good page builders help non-technical users build professional-looking websites, where they handle the back-end, allowing users to get creative with the front-end. Elementor does this better than anyone and is one of the easiest plugins to learn. It almost exclusively uses drag-and-drop which allows it to be simple and intuitive.
Moreover, Elementor comes with a great selection of global settings that users can play around with. Things such as defining fonts, responsiveness, and other elements the website and its web pages interact with, can all be tinkered with within the settings.
2. Elementor’s Widgets
You can’t make an Elementor guide without mentioning the plethora of widgets the plugin offers.
Elementor’s page is divided into 3 distinct parts – Sections, Columns, and Widgets. Sections contain columns and columns contain widgets. The widgets are the most important part, and these are what allow you to customize your webpage. They can be found on the left side of the screen – in the Elementor editor in the widget panel.
2.1. Elementor Basic Widgets
The Free version of Elementor comes with more than 25 different widgets. Included in these are Image and Video, Buttons and Tabs, Accordion, Google Maps, and Icon widgets to name a few. You can see the full amount below, but you are essentially getting all of the widgets you need to create a good functional website that will serve its purpose well.

2.2. Elmentor Pro Widgets
If you feel like the Free Version doesn’t quite meet all your requirements, the Pro version comes with more than 50 widgets. These include widgets such as Call To Action, Nav Menu, Table Of Contents, Gallery, Facebook Embed, and Animated Headline to name a few. These will be more than enough to meet your needs and is the best solution for any website.

These additional widgets will provide you with the tools to give your website a stylish and elegant design that it needs.
2.3. WooCommerce Widgets
Furthermore, if your website needs eCommerce support, Elementor has you covered. Elementor comes integrated with WooCommerce, and also comes with dedicated eCommerce widgets.

2.4. Additional Add Ons and Dev Tools
Somehow, if these widgets aren’t sufficient for you, know that Elementor also has the capability to support third-party widgets. These third-party Elementor add-ons can also allow you to create your own if that is something you wish to do.
The add-ons are specifically made for Elementor and its themes, meaning you can always rely on it to work with a WordPress website that is powered by Elementor.
3. How To Use The Elementor Page Builder
The next and most important step in this Elementor guide is to show you how the page builder itself works.
As mentioned earlier, the Elementor page builder comes with numerous templates to choose from. So, to begin, you’ll first need to create a new page or post.
3.1. Create A New Post/Page
To do this, simply login to your WordPress Admin Dashboard and navigate to Post or Page > Add New. This will open a new page or post editing screen.
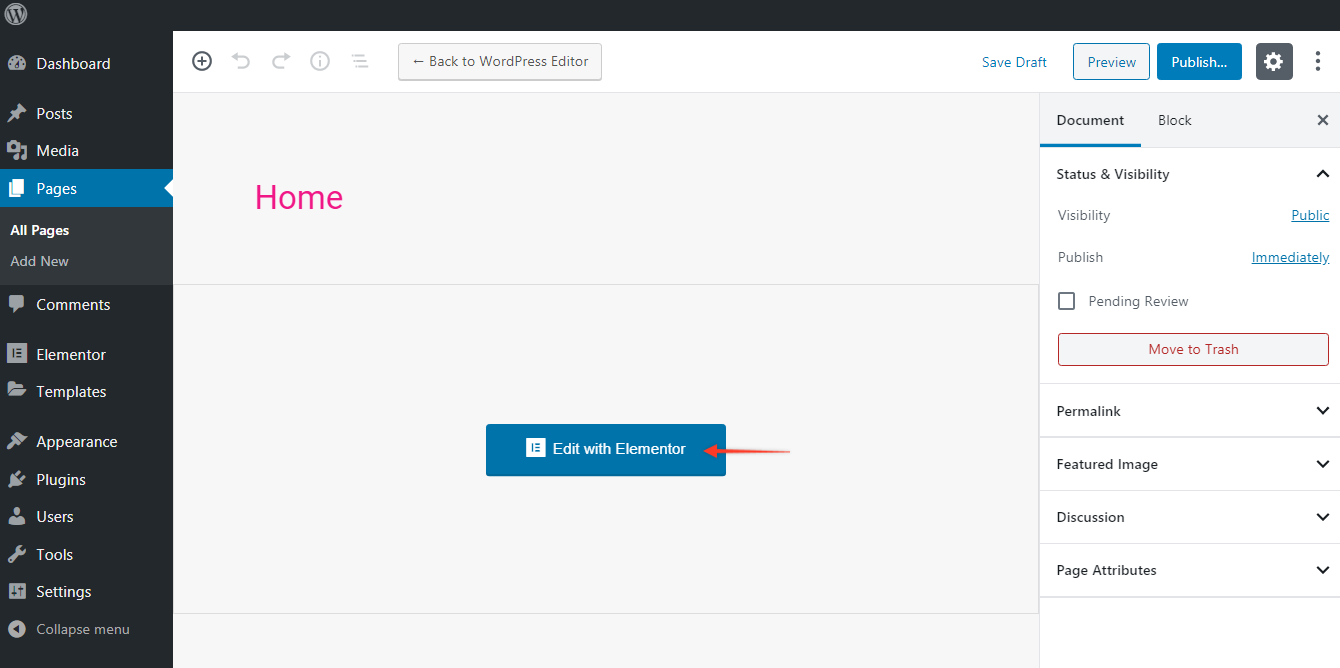
3.2. Edit With Elementor
By default you will be directed to the WordPress editor, however, we want to access the Elementor editor. Simply click Edit with Elementor.
3.3. Drag-And-Drop
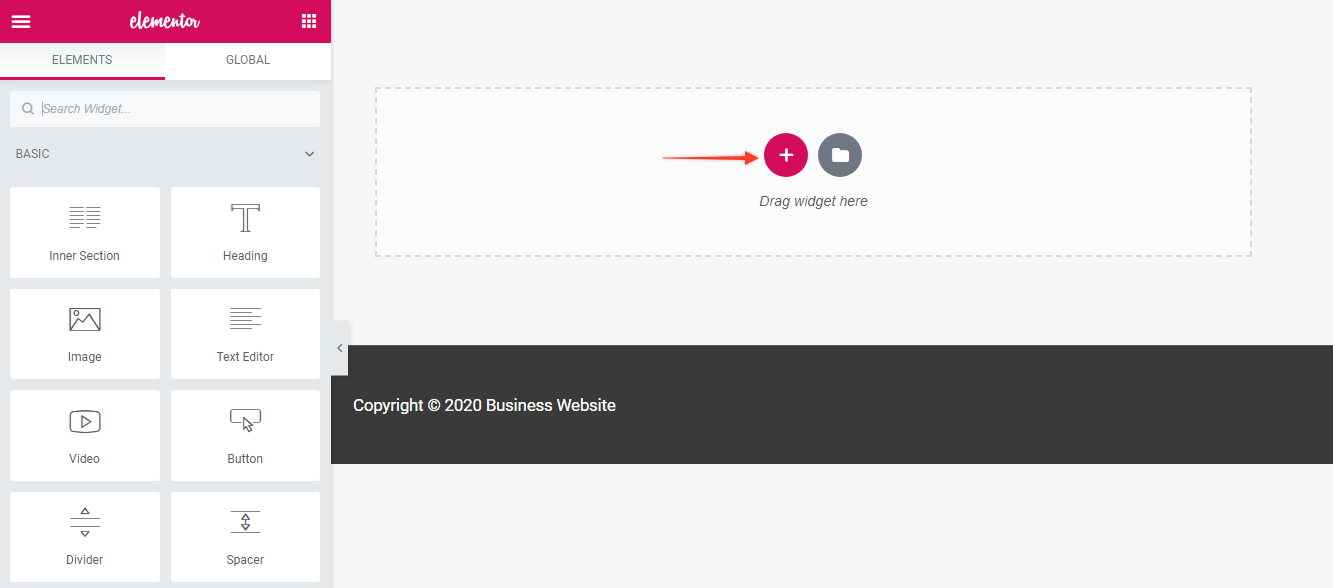
The page will of course be empty, so using Elementor’s easy drag-and-drop feature from the Elementor sidebar, you will be able to add any widget you want.
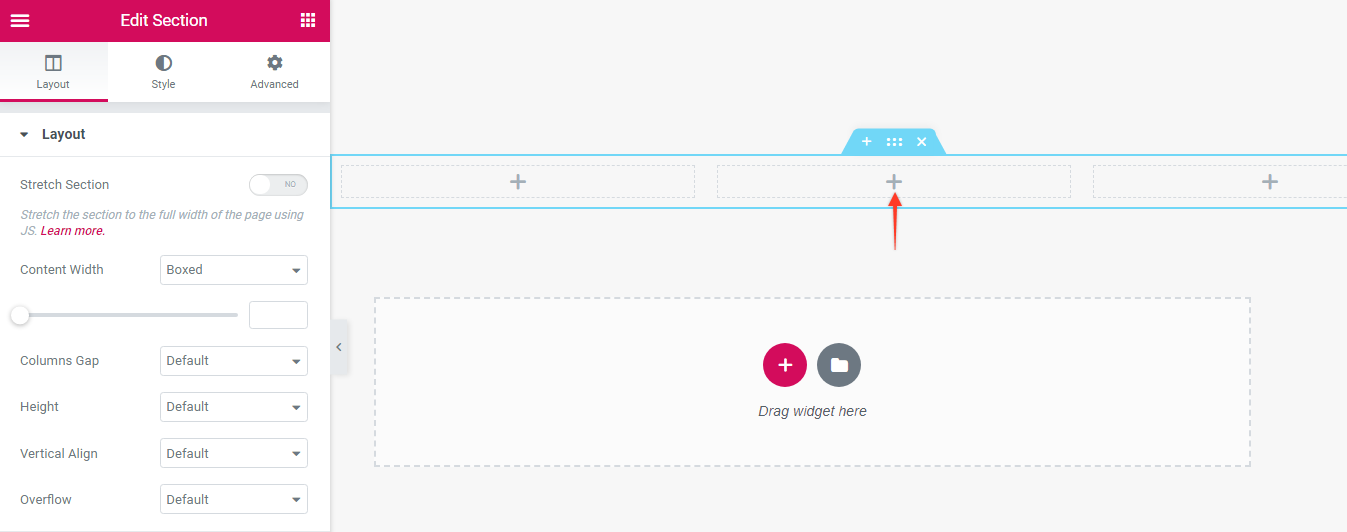
Let’s say you want to create a heading for your webpage, simply drag the Heading widget on the left to the middle section where it says Drag widget here. However, if you don’t want the heading to take up to the full width of the section, you can split the section into columns. To do this, simply click the red ‘plus’.
This will open up the possibility for you to Select Your Structure where you can choose from various column types. Once you have found a style that suits your needs, click it in order to create a new section.
For example, if you have selected the three columns option – as shown below – you will see the creation of three separate columns, all with their own separate plus button for customization.
3.4. Editing Settings
You can customize each section, element, and widget that you have on your page by clicking on the icon with six dots.
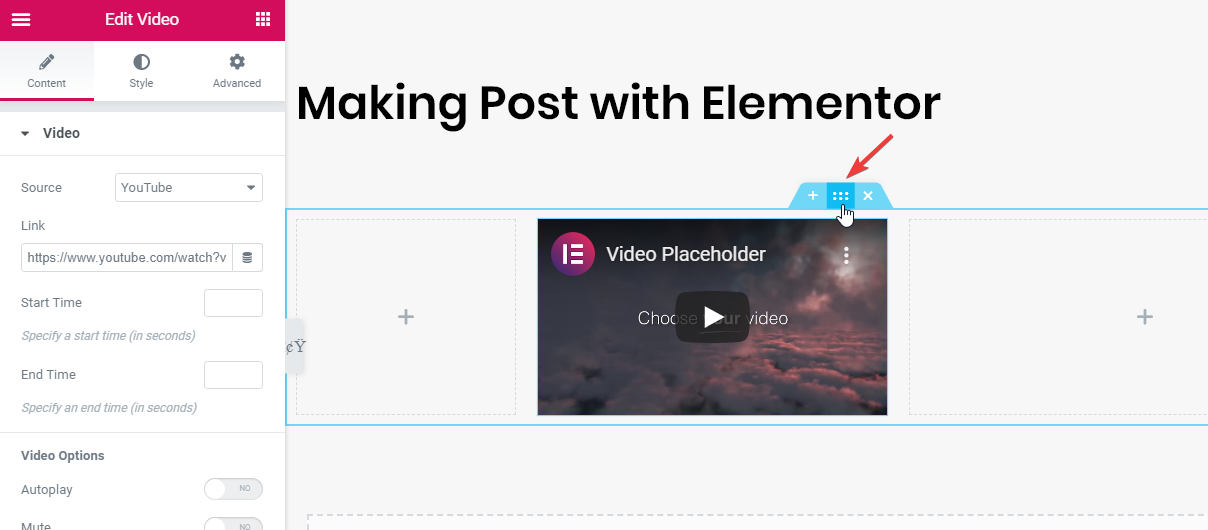
For every widget, you can change everything about it – style, content, margins, padding, and responsiveness, etc. All you have to do is click the settings icon for each widget. To get a better idea of the customizable options that are available for each widget let’s take a deeper look at some of the options Elementor has to offer.
4. Elementor’s Site Settings
If changing the style of each widget individually seems tedious and time-consuming, you would be correct. That’s why Elementor has Site Settings. As the name suggests, this feature allows you to control and alter the appearance of your whole website. This can be the color palette, typography, theme styles, and many more.

For example, Global Fonts and Colors is a new feature that allows you to change the fonts and colors of all your widgets and design features, all with a single click. You can also change the font and color for specific sections of your website, such as only the text for headings. By using a global font, you can change the typography of such a section, all at once.
4.1. Elementor’s Theme Style
This feature allows you to create presets for four different design elements: Typography, Buttons, Images, and Form Fields. To access this feature, simply navigate to the Global Settings panel, as you did with Global Fonts and Colors.
Imagine you plan to have many buttons throughout your website. Manually having to alter its appearance and style based every time you add it to your webpage will drive you insane. Therefore, creating a preset will ensure that every time you add a button element on a page or section, you won’t have to edit its style from scratch – it will already look the way you intended it to.

Making a preset is easy. First, you want to navigate to the Global Settings panel. Choose the element you want to create the preset of, style it as you wish, and then click Update.
4.2. Elementor’s Theme Builder
A huge part of Elementor as one of the most popular page builder plugins is its Theme Builder feature. It’s a great tool that allows you to make your own custom templates for parts of your website, such as the header, single post template, archive pages, WooCommerce pages, etc. As with the rest of Elementor, it is all done via its intuitive drag-and-drop feature.
To access the Theme Builder, simply navigate to Templates > Theme Builder.

Here, you can preview each theme element as you click on each tab which is incredibly handy. Additionally, you can directly edit the existing template.

To make a new template, simply click on Add New beside the blue plus on the upper-right corner.

You will then be redirected to a new page where you will have access to the Elementor Editor as we have shown in this guide. Here you can design your template from the ground up to meet whatever needs you may have.
The Theme Builder also includes an immediate display condition edit. This enables you to assign a particular template to a particular part of your site, immediately. To give you an idea of how it works, think of WordPress’s Quick Edit feature, where you can edit themes and make them unique.

4.3. How to Customize A WooCommerce Product Page In Elementor
We would be remiss not to mention how to customize WooCommerce in this Elementor guide. Combining WooCommerce with Elementor, you can create great custom product pages to boost sales.
First, you will need to install and activate WooCommerce to your WordPress dashboard, as you did with Elementor. Once WooCommerce is fully set up, it’s a few easy steps to design your product page.
Navigate to Elementor > My Templates > Add New > Single Product > Create Template. This will load the Elementor Library. Here you will be able to choose from numerous pre-designed templates, or you can build your own from scratch.
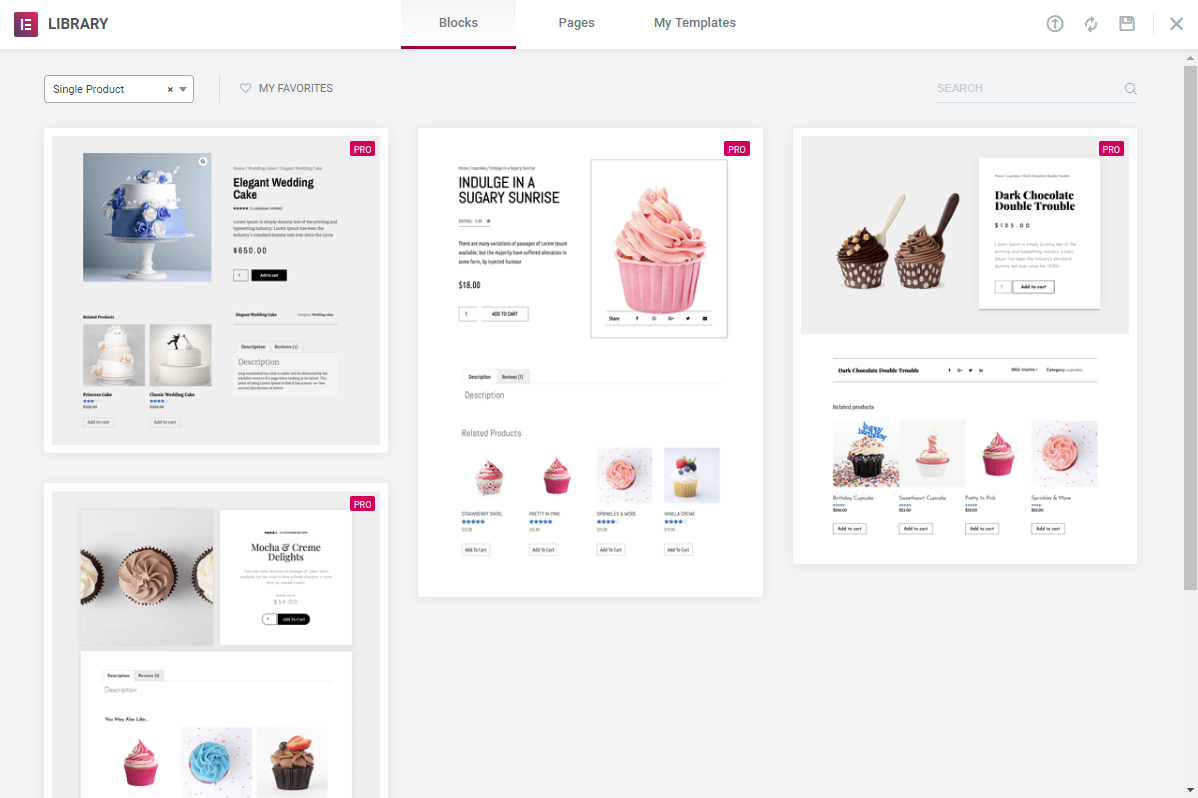
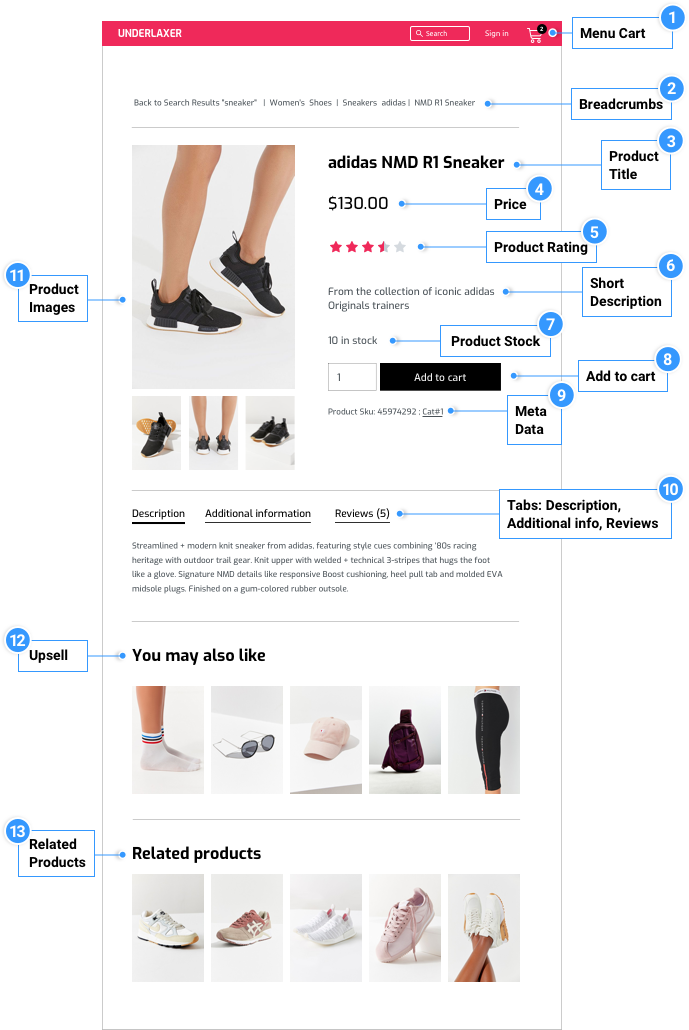
Once you have selected a template, as with a normal webpage, simply add various WooCommerce product widgets and customize it to meet your requirements. Here is an example of what you could design your product page to look like, and the specific widget used is numbered.
When you think you’re done, you’ll want to preview the page. Click on the ‘eye’ icon which can be found on the bottom left panel. Then, click Settings, choose the product you want to display.
5. Publish your Elementor website
Once you’re satisfied with the settings of each widget and the way your product page and webpage looks, it’s time to check the final product.
Aside from being able to see every change you make to your webpage in real-time, you have the option to view the final page from a page visitor’s perspective. This will ensure that once you’ve published your page, it looks exactly the way you envisioned.
More importantly, this is the opportunity to test and fix any page responsiveness issues that may arise. By scrolling to the bottom of the editing menu and clicking either the mobile or tablet icons, you will be able to see your webpage in Mobile View. Here you can test for responsiveness.
Once you are done optimizing, all that remains is to make your web page go live. Simply click Publish, and there you have it. Your web page is available for everyone to see.
Conclusion
There we have it, the full Elementor guide for beginners. As you may have noticed throughout this Elementor guide, it is a powerful plugin and a great tool that manages all the back-end work, giving you the freedom to be creative to design and edit the look of your website on the front-end.
It seamlessly blends ease of use with functionality, making it one of the best WordPress page builders out on the market.
If you like what you’ve read in this Elementor guide and would like to get started with the plugin itself, don’t forget to make use of our 30% off Elementor Pro Discount Coupon and grab yourself a tasty discount.
Also, don’t forget to check out our other guides like the one on MonsterInsights, we hope you will find it as useful as this one!
Comments are closed.