
If you’re on the search for an inexpensive method for building a website, you’ve probably encountered One.com during your research. One.com allows you to register domains, and purchase storage space for emails and websites, all in a single package.
The price is dependent on the number of extra features you want, but even its most expensive plan is very generous. So in this guide, we’ll analyze One.com’s Website Builder, discuss how to build your own website, and how to link it with WordPress.
[toc]
Getting Started With One.com
Before you can begin to use its website builder, you will first need to choose a plan. Luckily for you though, One.com has a 2-week free trial where you can try before you buy. Better yet, if you do decide to stick with One.com, you can get the first year of the premium plan for free.
But, we recommend starting with the 2-week free trial to see if One.com really is for you or not. Once you’ve activated that and made your account, it’s time to get into the Website Builder.
The One.com Website Builder
One.com’s Website Builder is a web-based tool that can be used to make amazing looking websites. It is incredibly easy to use and will require nothing from you except dragging-and-dropping, and an imagination.
Simply choose a template, drag the components you need to your workspace, and then begin creating!
Let’s dive into the process.
1. Choosing A Template
One.com comes with more than 150 beautiful templates. You can choose templates from all sorts of categories, such as Music and Art, Portfolio and CV, Food and Hospitality, Services, Events, and more.

All these templates are customizable to suit your needs. There are no limitations as to where you can and cannot place elements, what size you want them to be, or color. You have the ultimate creative freedom. And since the website builder is super responsive, everything is snappy and can be done extremely quickly.
2. Use The Drag & Drop Tool
The Website Builder comes with numerous elements you can use to build your website. For example:
- Mobile view editor
- Page sections
- Social Media Sharing,
- Scroll effects
- Gallery and slide show
- Contact form builder
- Cookie banner
All of these elements, and more, will enable you to create a functional website.
3. Features
The Website Builder comes with a few tools to boost your website as well.
E-Commerce: This function (which is only available to users on the Webshop plan – more on that later) serves its purpose and will allow you to set up your own e-store, without having to download and install 3rd-party plugins. Also, you can add an unlimited amount of products, and add PayPal or Stripe as payment options
Online Contact Form: The contact form that comes with the Website Builder is super easy to install. As with most things on the builder, it’s completely customizable, making it a perfect addition to your website. You can change the fonts, style, and number of fields in order to fit with your website.
Blog: One.com’s blogging functionality allows you to create content for your website. Unfortunately, setting it up isn’t as easy as simply dragging and dropping like its other features; it will take much more time and effort setting it up.

4. Ease Of Use
One of the hallmarks of a good DIY website builder is its flexibility in customization, and ease of use. One.com does a great job at combining the two together. You can build the exact look of your website you want, to a T, and all with the simple drag-and-drop feature. Easy as can be.
5. Customer Support
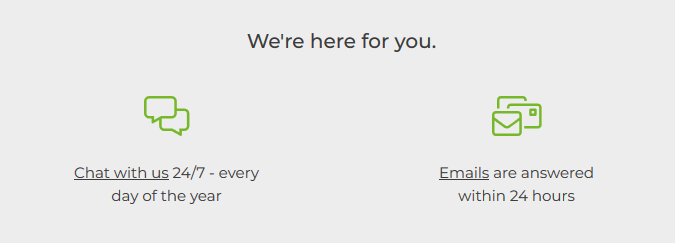
One.com has reliable customer assistance every time. They have a working live chat and phone number for the support that is immediate, as well as the possibility of email marketing, sales, and other departments if you wish to do so. The website also offers a comprehensive guide to the Website Builder. This kind of customer service is not easy to come by and is definitely one of One.com’s strong points.
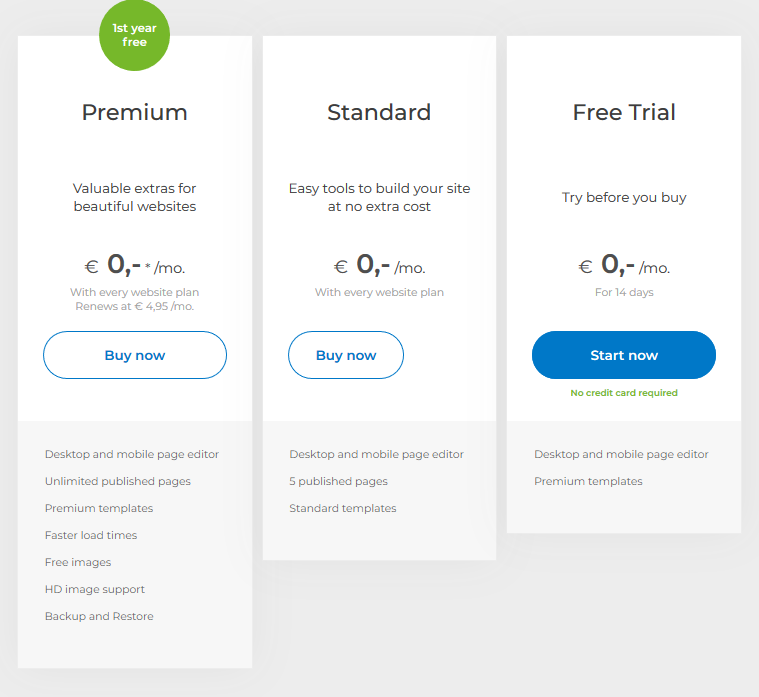
6. Pricing
As mentioned earlier in this review, One.com offers two paid plans. Both plans are extremely affordable considering what you get, and the first year is totally free.
The Standard plan will get you 25gb storage, unlimited bandwidth, security with SSL, responsive templates, one custom domain, and unlimited email accounts.
The premium plan comes with everything on the Standard plan, plus access to exclusive premium templates, support for HD images, capacity to publish up to 200 pages, and website backup and restore capabilities.
The third plan, Webshop, comes with all of the features of the Premium plan plus the ability to build a fully-functioning online store.
How To Build A Website With One.com
Now we know what One.com has to offer, let’s look at how to build a website using it.
Note: If you already have a Hosting Plan and Domain Name, and only want to use the Website Builder, skip to step 3
Step 1: Choose A Hosting Plan
Without hosting, your website cannot be published and go live.
One.com’s hosting plans include everything. From DNS features, PHP databases, the Website Builder, and more. There are 5 plans, ranging from ‘Beginner’ for personal and simple websites, to ‘Guru’ for more complex needs.
Step 2: Register Your Domain Name
The domain name will be the address of your website, AND, the second part of your email address. So be sure to think carefully about this.
Use the search bar to see if your desired domain name is available or not. Also, be aware of the extension for the website. For example, if your website is intended for UK audiences, it’s probably a good idea to pick a ccTLD like .co.uk.
Step 3: Pick & Customize Your Template
You can now get started on actually building your website. There are over 150 templates to choose from with varying styles and categories, so finding one for your website needs is easy.
The template will define the overall appearance of the website so it’s a step that shouldn’t be overlooked. And don’t forget to you can customize it to your needs.

Step 4: Create & Add Content
Now for the juicy part – create and add the content that you want on your website.
With the website builder, you can easily add all of the content you want. Whether that’s text to create a story or define product information, or media such as images and videos to convey a message in a visual format, anything is possible. If you want, you can even add HTML coding.
Step 5: Publish
Is your website design the way you envisioned it? Have you added all the content you wanted to? Then it seems like you’re finished with creating the website. All that remains is to publish it.
Simply click Publish to make your website go live. Now it can be viewed by anyone on the web, and you can begin your digital journey.
In these 5 quick steps, you can create a functioning website. It couldn’t get any easier. But what if you have an existing site on WordPress that you’d like to move over? Then read on.
1-Click WordPress Migration
With WordPress 1-click migration that one.com has to offer, you can move existing WordPress websites from one location to another. This is perfect for transferring your domain to One.com or if you simply want to change your domain name.
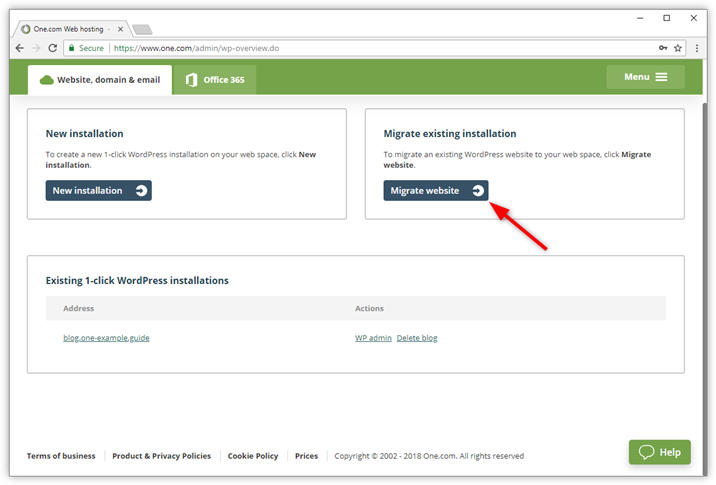
Step 1: Migrating
First, you will want to log into One.com’s control panel and click WordPress. Then, click Migrate website to begin moving your existing WordPress website to your own webspace.
Step 2: Choose A Location & Start Migrating
Choose the location that you would like to migrate the website to, and click Start Migration.
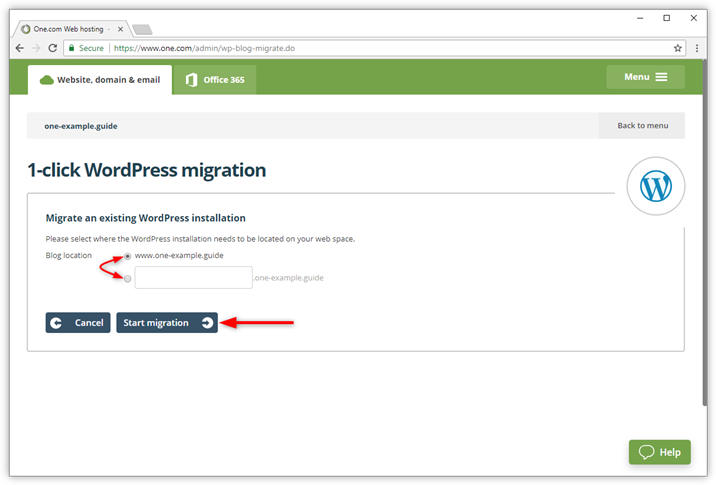
Step 3: Validate Existing WordPress URL
On the 1-click Migration pop-up, click Continue.
You will then be brought to the next step which is where you will enter your Existing WordPress URL, and then click Migrate.

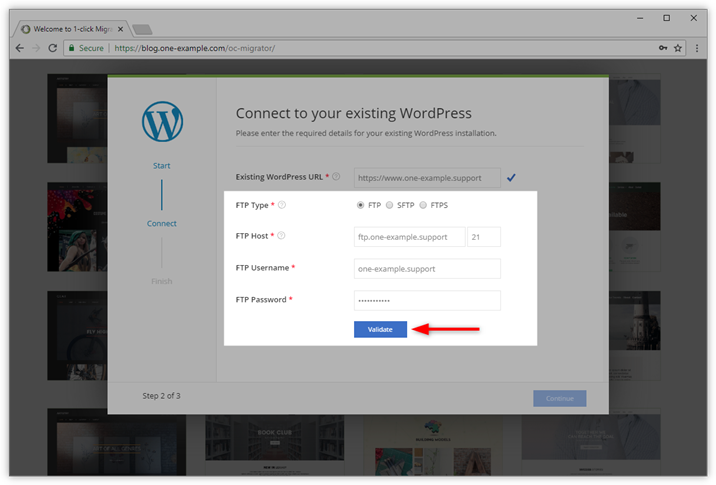
Step 4: Enter FTP Login Details
To continue with the migration, you will have to log in to the webspace where the website is currently hosted.
- Select an FTP-Type
- Enter FTP login details
- Validate
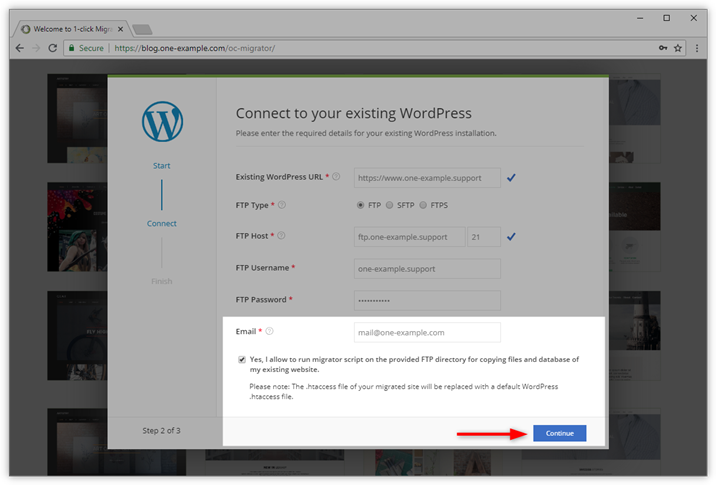
Step 5: Confirm & Continue
Here you will want to enter an email address. It will be used to send a notification once the migration has been completed.
Then, check the box to confirm that you enable One.com to run the migrator script, and then click Continue.
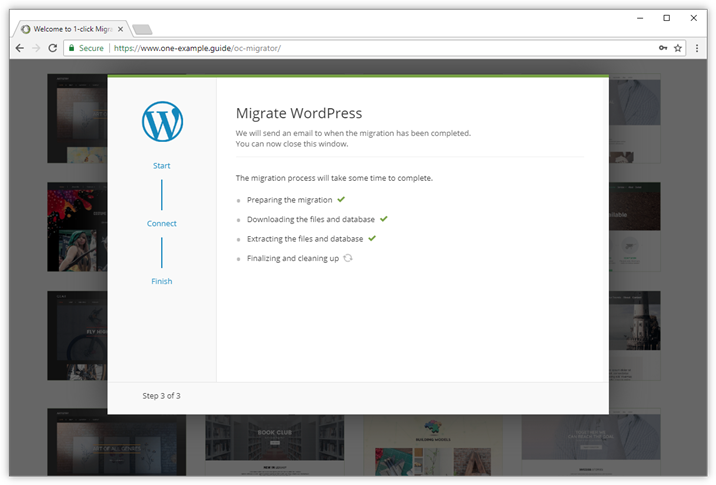
Step 6: Wait For Migration To Finish
This is the boring part. The migration is now in progress and normally it takes approximately 10 minutes to finish. Once it has finished, you will receive an email notification.
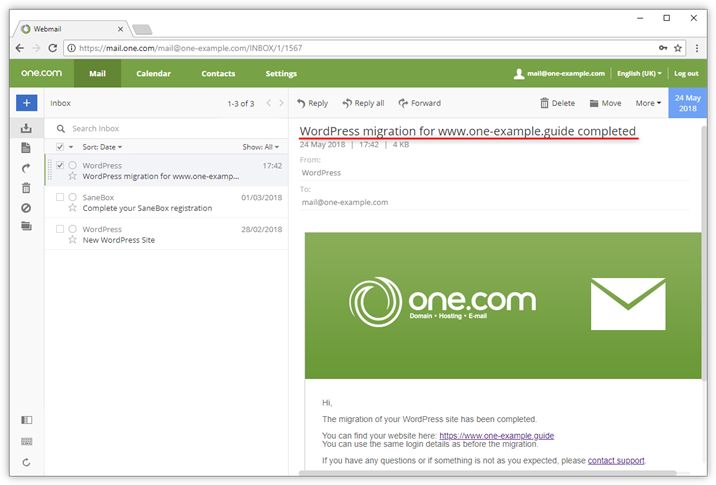
Step 7: Check For Confirmation
Once the migration has completed, you will receive an email confirmation. Make sure to click on the link to see if everything is as expected.
Conclusion
One.com’s Website Builder makes it possible for beginners to create a website on a budget. You have a large selection of templates to choose from, customization options, and good customer support.
However, the low price does reflect the list of features you will get. Although you have enough to build a functioning website, it is no match for the top website builders currently on the market. And, if you want to add an online store or build a website that has more than 5 pages, you will have to pay extra.
If none of these issues is a problem for you, then One.com is a brilliant choice to create simple and modern websites that will get the job done.
Comments are closed.