
If you are thinking of creating a mobile app for your business to increase your sales or customer loyalty, look no further. Gappsy could be your answer.
Gappsy is an inexpensive mobile app building software, which requires no coding whatsoever! Best of all, this technological gem is easy to use thanks to the Drag & Drop tool and allows you to create an app in just one hour.
Simple, yet powerful, Gappsy lets you fully customize your app to your needs with a wide library of templates and advanced features and create clear and concise user interfaces.
However, the tool is not free. But, the pricing varies on the extra features you want, such as the number of users you can support, whether you allow advertisement on the app, different functionalities, and, of course, the amount of storage you need.
In this guide, we’ll see an in-depth guide of how to get started and build an app in record time, and how to publish your new Gappsy app in the App Store and Google Play.
Let’s get right to it.
[toc]
Getting started with Gappsy
The Gappsy mobile app builder is a no-code developer tool that can be used to create an app for your business, with hundreds of features and plenty of templates to choose from.
The interface is intuitive and doesn’t require a development background. But before you get into the development of your new app, you will first need to choose a pricing plan.
Unfortunately, there is no longer a free trial plan, however, Gappsy does offer a 14-day free trial. So, there is a risk-free solution to try the software without losing any money if you cancel your subscription.
1. Choose a starting plan
Gappsy comes with two plans, the Basic Plan and the Premium Plan. in turn, each of these plans comes with a monthly billing option or a yearly billing option.

Of course, there are a few differences between the basic plan and the premium when it comes to both pricing and features.
For example with the basic plan, you cannot add push notifications to your app, and it does not support any social media-like, Uber-like, or Woocommerce features.
In comparison, the premium plan comes with all of those features, as well as Zapier or webhooks integrations, native web integration, chat system, loyalty, and scratch card systems, and more.
However, if you are just starting out, we recommend choosing the basic plan and try the tool out first. Then, if you are happy with it, you can always upgrade.
2. Choose a design
Gappsy gives you access to more than 100 mobile app templates and layouts. The templates are organized by categories such as Arts, Corporate, Entertainment, Local Business, Organizations, and Sports.

Once you’ve chosen your favorite, you can start customizing it to your needs, playing with different elements and widgets, and adapting them to your preferences.
Not only that Gappsy allows you to create the best design for you and your users, but it also lets you add your own logo, as well as your own URL, email server, login section, and teammates.
3. Drag & Drop Tool
To create a highly functional app, Gappsy comes with numerous building elements you can use to develop your app.
All those elements are customizable, from text to pictures, choose your own videos, pictures, and colors. For the most powerful part of Gappsy Drag & Drop builder, we find a wide library of plugins.
The tool comes with numerous elements you can use to build your app, such as:
- Push Notifications
- Webshop
- Loyalty Points
- Scratch Card
- Appointment Planner
- Inframe
- Social Media Timeline & Live chat
- Music and Video integration
- Contact Page
- Integrate a Google Adds account
- App Dashboard
4. Goal based Features
The Gappsy mobile app builder comes with flexible, advanced, and modern features to make your app more usable and efficient.
4.1. Organization
For efficient management and control of your app, Gappsy comes with features such as Appointment Planner, Calendar, and the Content lock element to control the access of your different memberships.
4.2. Monetization
These features will help you boost your app and user base thanks to elements like e-commerce, loyalty cards, AdMob (monetize your app with ads), high-performance discounts, scratch cards, invite-a-friend referral system, and QR coupons.
This unlocks possibilities such as,build your own Uber-like app, create menus and cards, or even integrate your own radio show.
Moreover, these features also help you collect users’ data,so you can create targeted marketing campaigns in the future.
4.3. Communication
Keep your users engaged and update them with the latest news via push notifications or private messages (inbox). Or earn their loyalty by making a quizes, forms, adding a live-chat system for one-on-one conversations or in a group.
Not enough? Create conversations by responding to others’ posts and quations on a social wall and show your suers that you care.
4.5. Local targeting
Location based featuers are great for targeting local markets. For example, create a market place and use geoolocation to show your local users which products and services you are offering.
Another option is to create a directory of your business in the element Places, and update your users about the weather, or guide them through the GPS in their phones in Maps.
The possibilities are there, you just have to find your niche.
4.6. Entertain your users
To entertain your users you can integrate audio and videos from social media, or create and share playlists where users can buy tracks from.
Even better, let the media be played in the background while the users keep browsing the app. And since you have their attention, feature your news feed or blog, and take advantage of the situation to drive traffic to your website.
5. Customer Support
The customer support in Gappsy is built by a team of tech professionals and hard-working humans, with fast responses within 24 hours.
They don’t have any live chat working nor a phone number for immediate support, but they have a contact form where you can leave all your questions.

Also, the developers are highly responsive to listen to users’ ideas and thoughts. So if you should ever get stuck or have any questions, create a ticket and their support team will get right back to you.
7. The deal of a lifetime
Now that you had a chance to play around with the app, let’s discuss pricing. As mentioned earlier, Gappsy offers two plans with different payment options (monthly or yearly).
Considering the pricing of their competitors, both plans are very affordable, with the standard costing 37$, and the premium with exclusive elements, designs, and features, just for the price of 57$.
That said, asuming you are planning on building a more complex app, it is recommended to choose the yearly billing option that will help you save up to 25% on your Gapsy plan.
There is, however, a downside to this. Since Gappsy acts and works like a CMS for mobile development, they take care of maintaining your app’s features and functionality on par. Moreover, they also maintain the app in the Apple and Google stores.
Therefore, you cannot – or rather should not – cancel your subscription. Cancelling your subscription will remove the app from Gappsy’s servers, and by default, it will also remove it from whatever app stores you app was available on.
But, don’t worry, Gappsy has a solution for this as well, in the form of a lifetime deal.
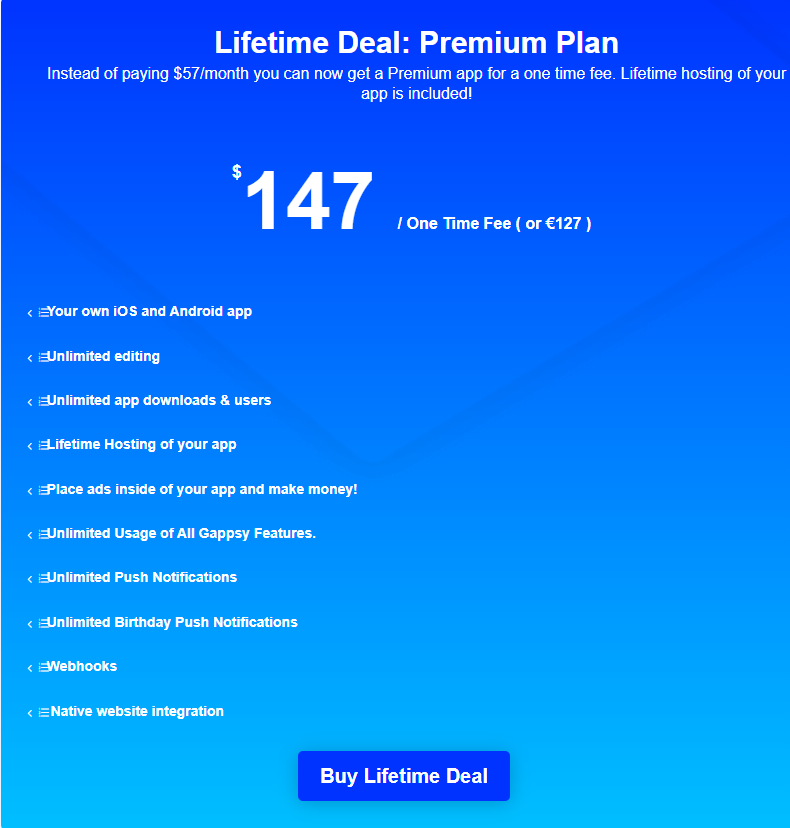
So if you are serios about building an app and you are planing on continuing on improving it, you can choose the option of a one-time payment of $147.
not only that this is much more affordable, but this will get you all of the Premium features, including hosting, at no extra costs aside from the one-time payment.
How to build an app with Gappsy
1. Create a new application
To start building your new application, log into your account. On the right side of your dashboard screen, you’ll see the My Applications category. Click on the “Create a new application” button and write down the name you want to give it. Next click create.

After that, it will take you to a new screen where you’ll have to click on a remaining slot, and then save to activate the app. If you don’t have any missing slots, that means you have exceeded your app limit, you can always go to the building option and buy more apps from there.

2. Manage your app
This is where the building of your app takes place. The building consists of five main steps:
- Design your template and change the layout.
- Chose the colours and look of your website.
- Decide which features and functionalities you want to add to the app.
- Change the settings in the applications tab, and generate source code.
- Publishing of your app.

There are also additional functions useful to add more functionality and ensure great maintenance of your apps, such as managing your users, promoting your app, send Push notifications, and advanced analytics settings.
You can see all changes you are making on the right side of your screen, in the mobile emulator, with no need to download an APK installer on your device.
3. Start the editing
3.1. Templates
To start editing your app, select one of the multiple templates they offer, all of them are open to any change of color or background. Once you’ve chosen your template it will be applied to the mobile app you’re building.
The next step is changing the layout and icon placement to your preferences. You can see all the options which are currently available on how you can display the icon.

To see how your template and layout will be displayed in different sizes of devices, scroll down to the Unified Homepage, and click on the “download a template PNG”. This will help you to see if your background image suits your building.
If you don’t like the Font, scroll down to “Choose your font-family” and you’ll find different options to choose from according to your preferences, or pick the predominated Google Font.

3.2. Choose your Colors
You have total control to change the color pallete of your app, and the color customization panel It’s organized by different sections such as general, homepage, headings or lists.

In each section, you can choose set the colors of the text, backround and broders based on each section and its hierarchy or purpose.
3.3. Features
The features elements are the most important ones as they are the ones that will make your app function a certain way.
And you want to offer the best experience to your users, so you want to make sure the modules you choose support your app.
As seen previously in this review, they offer a wide variety of modules to choose from; social, media, contact, monetization, customization, integration, events, and music.

To see and custom the modules you’ve already added, you can do so in “Your Page”, found on the top of the screen. Let’s say you want to change the Information module, by clicking on it, you are able to add and fully customize extensions, by adding a text, image, videos, address, buttons, attachments, slider, and cover.
Every feature has different options and modules that can be fully customized and lets you manage the content inside them.
3.4. Application
In this tab you can change the general settings of your app:
- Application icon (recommended 256×256)
- Back button.
- Push notifications (create and set an icon)
- Splash screen

3.5. Publication
Here you will find your subscription information, general information, and you can see the preview of your mobile app.
Simply click on the link next to the “WebApp link” so you can test it out and see if it’s responsive for the different devices.

To start earning revenue from advertising through your app make sure to include your AdMob credential.
In this tab, you will find the mobile source codes, so if you want to download the source code all you need to do is click on generate source and it will automatically generate a source file and download it. You can also generate an APK and give the version number.

3.6. Promote
If you want to promote your stools, go to the Promote section and it will generate a QR code.

3.7. Messages
This will be useful to send custom push notifications to your users by entering a message and click on save.

3.8. Analytics
Here you can see a more in-depth analytics screen, both for features and functional analytics.
The features analytics are:
- Total of visits and installs
- Android or iOS device
- User localization
- Time spent in the application
- Visits by features

The functional analytics show you the data of commerce such as sales and visits, loyalty cards, scratchcards, among others.

3.9. Payment gateways
Gappsy not only supports a WooCommerce payment integration, but they also have their own e-commerce system, so you can get money out of it and let users pay for the products.
3.10. Settings
In this section you can adjust the terms of service and conditions of the app, changing the predetermined template, the domain, advanced application options, and the API keys from your social media.
4. Publish your Gappsy App
publishing your app in either Appstore for iOS or Google Play for Android can be a nightmare. If is a long-stepped process that often feels like too much.
Luckily, the team at Gappsy can do it for you, for the price of a one-time fee of 197$.
The publishing system includes:
- Publishing your app in both iOS and Android stores.
- Creating all the necessary certificates and files.
- They will not republish your app more than once.
- Fundamental changes in your app (new icon, background, descriptions, and more) may require republishing.
- Adding or deleting a plugin does not require republishing in most cases.
- Apple and Android may require republishing your app once a year.
If you need to republish and don’t want to do it yourself, contact their team and get a big discount on this service.
Keep in mind that due to new guidelines, every developer needs to have an account which costs 99$ a year for Apple, and a one-time fee of 25$ for Android.
Conclusion
If you are struggling to develop your mobile application because of all the coding required, Gappsy will make your app-building easier. The app developer is a game-changer, easy to understand, with an intuitive interface that requires no coding thanks to its Drag & Drop tool, and is full of features.
It’s simple to use yet powerful and affordable. However, the lite version doesn’t pay off as it has some limitations, so make sure you can invest your money in the Premium package, or better, the lifetime deal with a one-time payment, because if you decide to cancel your subscription and delete your App from Gappsy, it will also be deleted from the stores.
If the pricing is not an issue for you, then Gappsy is a great choice to build a robust app quickly with plenty of tools and features.
Comments are closed.