Visual Composer is a WordPress plugin with the aim of helping beginners and professionals build a website using a simple drag and drop editor.
The plugin has many things to offer, from predefined templates to ready-to-use elements that can be used to create a website from scratch as well as work with already existing content.
Thanks to the user-friendly interface, with Visual Composer you don’t require to have any coding skills to use it, plus it is SEO.
The excellent WordPress plugin will make it easier to build a professional website, and rank top on Google and other search engines.
Moreover, this step-by-step Visual Composer guide will show you everything you need to know and a complete guide to taking all its advantages.
Enjoy!
[toc]
Prices and Packages
A past downside of Visual Composer was that unlike with other WordPress page builders competitors such as Divi or Beaver Builder, you needed to create an account before you installed the plugin on your WordPress website and started using it.
Not anymore! Now, an account is made for you automatically when you install and activate the free version of Visual Composer Hub or purchase a Premium license.
Once your account is made, you can access it through the My Visual Composer dashboard or directly from your WordPress dashboard.
If you are not sure whether Visual Composer will fit your necessities or not, you can start with the Free version. However, keep in mind this version comes with limited features.
So you should consider purchasing the Premium version to unlock its full potential. Also, as with most other WordPress page builders, Visual Composer provides several Premium packs, based on different company sizes and their needs.
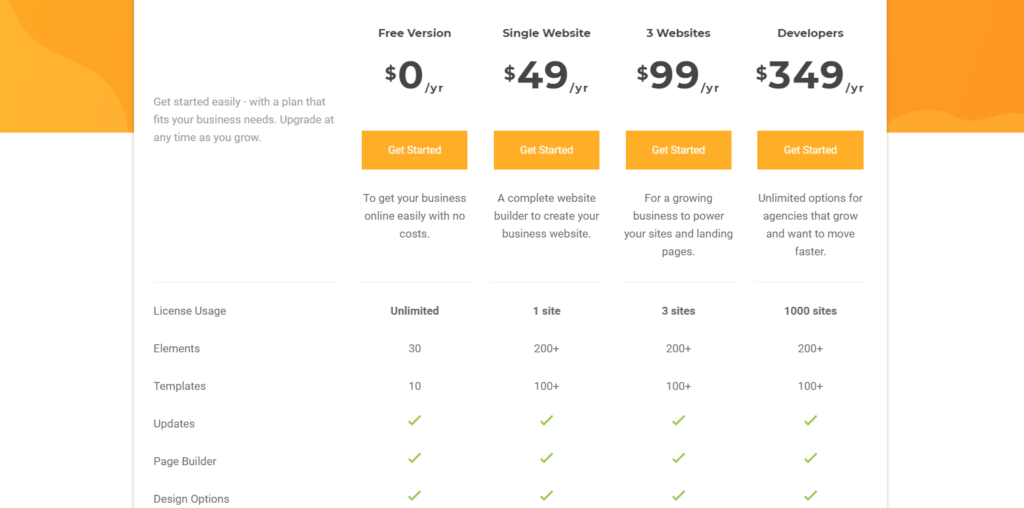
The free version comes with only 10 templates and 30 elements. Regardless, these features are more than enough to provide you with essential elements to build a simple website.
This version also allows you to use Visual Composer on as many sites as you want. So you can use it on several types of sites, such as a portfolio, a blog, or a simple landing.
However, if you want full access to all the features and these basic elements are not enough, you can always upgrade to the Premium plan, risk-free.
All Visual Composer Premium versions come with a 15 days money-back guarantee where you get a full refund within that period.
How to Visual Composer to WordPress
When you get a premium version, you will need to fill in your billing information on the page you’re redirected to. There you’ll see an option to download a set of required files.
But, when you click on a Free version you are automatically redirected to the download page.

Once you’ve downloaded the files, log into your WordPress Admin Dashboard, and click on Plugins. Here, select “Add New” and upload the file you previously downloaded.
This will install and activate the plugin, and Visual Composer should appear in your plugins list as well as in your menu on the left.
How to Activate the Visual Composer Hub
To connect your account with the Visual Composer Hub, select Visual Composer in the dashboard and then the “Getting Started” option.
From there, you will be presented with a basic overview of the differences between the Free and Premium version and an option to use your license key for the Hub activation.
To activate the Free version account the process is slightly easier, as each free version signup comes with a and activation key.
With the simple step of typing in your email, you will claim your key then copy-paste it into the WordPress Admin dashboard to activate the Visual Composer Hub.
On the other hand, if you have a Premium subscription, go to the My Visual Composer site and log in with the account that created for you when you purchased the license.
Once in, from the Licenses section copy the key and enter it on your Visual Composer account in the WordPress Admin dashboard.
Get Started with Visual Composer
Now that you’ve successfully installed and activated Visual Composer, you can start building. Visual Composer allows you to either use its menu or the WordPress traditional page menu.
However, when using the Getting Started Visual Composer option, the editor walks you through a step-by-step guide that allows you to select between several layouts so you start adding new elements or simply choosing a from-defined template.
The elements on Visual Composer will be your greatest assets when customizing your web page to your preferences and needs.
But before we go deeper into what each element is, it is important to learn how to navigate through Visual Composer and how to use the Visual Composer interface.
1. Frontend Editor
Probably the most important part of Visual Composer. In the editor, you will see the layout or your page in real-time which is also known as a WYSIWYG or “what you see is what you get” editor.
From here, you control and customize your content before publishing. The controls enabling this customization and edit is none else than Element controls.
2. Navigation Bar
The second core part is the Navigation bar, giving you access to the rest of the features in the Fronted editor.
When opening the editor, you will notice that the default location of the Navigation bar is on the left side of the screen. However, this is changeable to the size and place you please.
The navigation bar is your gateway into all of Visual Composer’s options and tools – at least the ones available with your license choice.
Here you find and add elements or templates, open Tree view, check the layout on different devices, open Visual Composer Hub, and more.
3. Drag and Drop
The well-known drag & drop feature allows you to play with the overall structure by quickly and easily edit each page layout however you like.
So either drag and drop each element on the page or add new ones by dragging them directly from the Add element window and inserting it into a specific place within your layout.
4. Element Controls
Each element that you will use while working with Visual Composer has its own set of controls generally divided into 3 categories which are also recognizable through colors:
- Row controls (Blue);
- Column controls (Yellow);
- Element controls (Green).
Hovering over different elements will open their specific quick control options like editing, cloning, or removing which you can use for customization according to your needs.
5. Edit Element window
In case you want to change specific parameters of certain elements, you can easily do so by opening the Edit Element window.
On this screen, you will find a varied range of possibilities of how to make the content fit your vision. As per usual, you can customize everything from color, shapes, even advanced design options where you can adjust some basic HTML/CSS attributes.
Additionally, you also have an option to rename your custom elements. This makes it a lot easier to find it while working with a Tree view in the future.
6. Tree View
To see an interactive and clear overview of your layout and all its elements head to the Tree View feature. You can see the structure of your content and rearrange the elements to your needs.
This mode is easily accessible through the Navigation Bar, with automatic saving by every change you make.
7. Preview, Save, Publish and View a Page with Visual Composer
Changes made on the site are only visible to you until they are saved and published. So before you release your new layouts into the world, make sure to get a full overview of what your user will see when the page is made public by clicking the preview tab.
If you still want to make some changes, click on save and continue customizing. This will ensure your progress is not lost in case of a situation like your internet stopping all of a sudden.
Also, remember to check your mobile responsiveness. Google will penalize those pages that are not optimized for mobile devices and tablets.
Once everything is ready for launching, click on publish so your page becomes public. Don’t worry, you can always return to your Visual Composer Hub and add more value to your page or update your content.
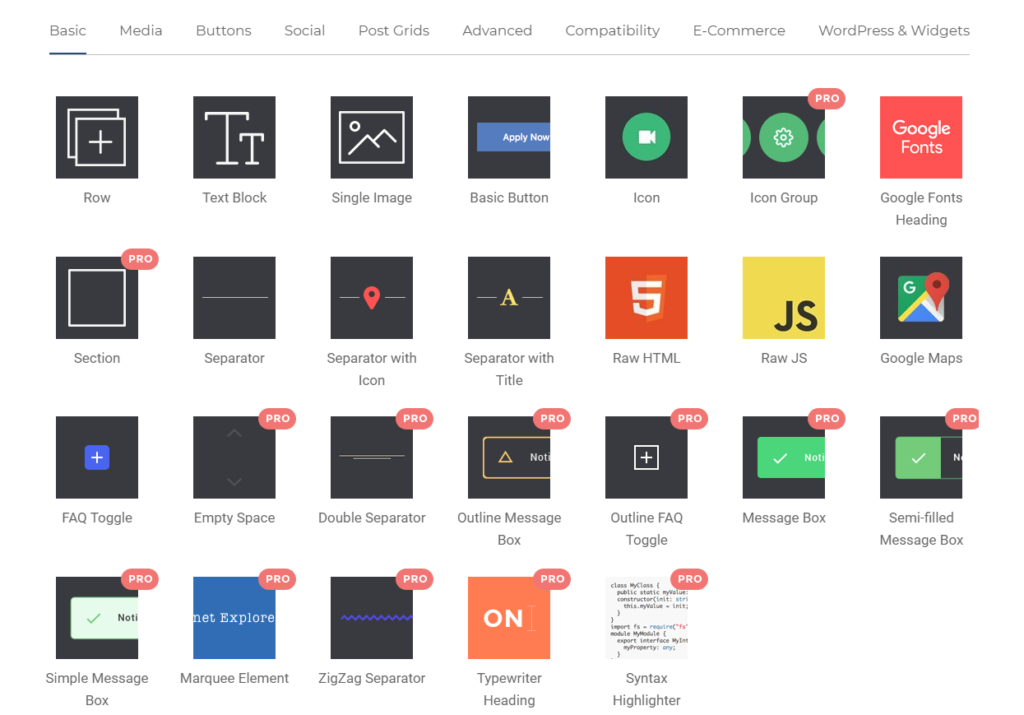
Visual Composer Basic Elements
Now that we learned how to get started with Visual Composer, let’s see what elements are the most important to Strat building your page from scratch.
1. Basic Visual Composer Elements
These elements are what your layout is made out of, including text blocks, rows, sections, buttons, images, and much more. As mentioned before, the Free version comes with 30 basic elements.
Meanwhile, a premium license will come with more and better elements, hence more customization options.
To see all your available elements, go to the Add element window of the Navigation bar. Remember you can always get new ones through the Visual Composer Hub. The Visual Composer elements are divided into six different groups:
- Basic
- Media
- Containers (contains only row/column element)
- Social
- WordPress
- Content
However, elements are often classified into more categories than that.
2. Grid Layout
Following the element classification, we find a new one, the layout. This separates these elements into two simple categories, structure and content elements.
Structure elements consist of rows, columns, and sections, and make up the base of your overall layout structure. On the other hand, Content elements are made out of all the other regular ones and only work if there is a Structure element in place.
This means you first need to place a row before placing content elements like buttons or images. The row can also be further divided into columns and each empty column can be used to hold a content element.
As seen in the video, the row and its layout itself are fully customizable elements and which will provide many different combination options for creating a unique structure for your website.
3. Basic Row Options
When adding a basic row, you are able to adjust general properties like the size of a Column Gap, Row and Column width, and Content position in the column.
Moreover, in case you want only one row to be visible at a time, you can turn on the Full Height Row option.
4. Sticky Row
But, if you think your content is too plain and want to make it more dynamic you can use the Sticky Row option, which allows you to keep specific content visible while your visitors up and down the page.
In addition, there are several ways to optimize its parameters and set up a specific behavior of this feature.
5. Adding Content Elements
There are different ways to add new elements to the layout. The most common is choosing one from the Add Element section in the Navigation bar.
Less obvious ways to add an element is, for example, using the bottom menu which serves as suggestions. But also, hovering over an empty column, or simply using column, or element controls.
The best way to go with is the one that feels more natural to you, whatever option you choose, the results will be the same. This is simply because Visual Composer aims at providing you with the best experience and the fastest possible options.
6. Social Icons and Widgets
On a large scale, our personal everyday life is thrown into Social Media, becoming a norm for business strategies as well. So, don’t forget to connect your site with platforms like Facebook, Instagram, Twitter, or Pinterest.
The icon and widget essentially divide them into social media elements with incoming (Social Widgets) and outgoing (Social Icons) content.
Each of them is divided by purpose, sharing social media content on your website and sharing your website content on social media.
7. WordPress Default and Custom Widget
To use any WordPress default and custom widgets head into these elements. All you have to do is searching for the element you want in the Add Element window, add it, and select a specific widget you would like to use. The feature will allow you to choose from all available options.
8. WordPress Shortcode Element
In laymen’s terms, these shortcodes are small bits of code that allow you to add some advanced features to your page such as a video player.
WordPress comes with some shortcodes of its own, but some plugins have extra as well. And of course, developers can add even more.
The objective of shortcodes is to enhance functionality and keep a simplified process. In other words, have the feature without the plugin which helps with page speed and security.
Keep in mind that some performance issues may occur when you use too many shortcodes.
9. Gutenberg Element
To replace shortcodes with modules, use the Gutenberg editor element, which gives you more design customization options and reduces the chances of the slow loading speed, or other performance hiccups created by shortcodes.
To use it, you will need to install a separate plugin named Gutenberg into your WordPress and activate it.
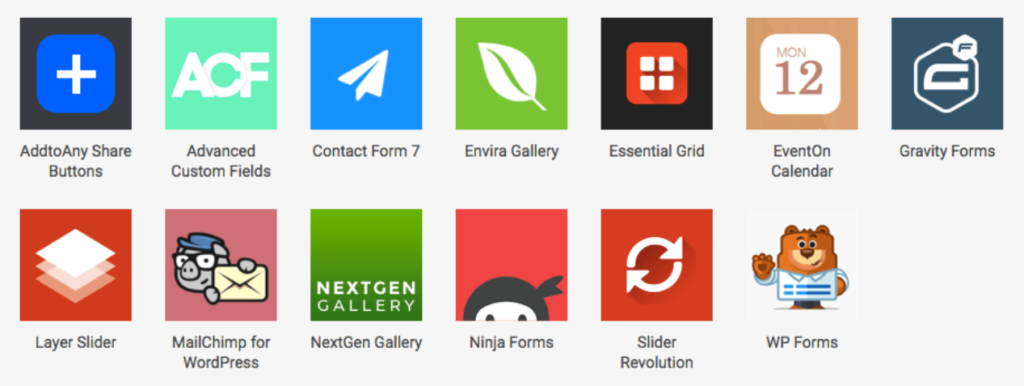
10. Compatibility Elements
There are some plugins that are simply too important for your website to replace or miss out on, like for example Contact Form 7.
This is why Visual Composer provides an option to enjoy the best WordPress plugins in the Compatibility Elements list. All of the available extras are found in the Visual Composer Hub and the list is constantly updated.
11. Lightbox
The user always comes first. To give them a better experience, which translates to higher satisfaction, add a Lightbox element, you are definitely going in the right direction.
It allows visitors to see images from your site in fullscreen mode.
This element will help showcase products in higher quality, make storytelling more clear and visible, and create a memorable experience for your users.
It is as easy as enabling an OnClick action on the image element. Moreover, there is also a similar element designed for allowing video fullscreen – Video Popup.
12. Custom HTML and JavaScript
To end up with, for the more tech-savvy users, there is also an option to insert Custom HTML or JavaScript code to personalize your website even further.
In order to start, you will need to use either the Raw HTML or the Raw JS element. Once it’s done, you will be free to insert your own code, which will automatically translate into the Frontend editor.
Even though, inserting any custom PHP code via Visual Composer is forbidden due to security issues. So, users who want to use custom PHP code must add it directly into the .php files on the server.
Conclusion
There is a never-ending list of WordPress plugins that help you build a website without any required coding skills, which makes it difficult to choose your perfect fit.
But what seems to make Visual Composer stand out and worth a try is its enormous amount of easy-to-learn elements. Even though our Visual Composer guide was fairly comprehensive, there is nothing above some practical knowledge.
In order to truly appreciate its possibilities, the best option you have is to try it out yourself to look into what this plugin has to offer, whether you are a beginner or a professional.
If you are thinking of installing it on your WordPress website and play around, remember you can even try out the premium version risk-free with Visual Composer’s 15-day money-back guarantee option.
Whichever you choose, you will surely discover element combinations that work for you. and will make your website look like it’s been build by professionals.
Comments are closed.